
How to Draw Mountains
Learn how to draw mountains with this easy step-by-step guide for beginners. Follow simple techniques to create realistic mountain landscapes with depth and texture. Start drawing stunning mountain scenes today!


How to Draw Mountains – Step-by-Step Guide for Beginners
Mountains have inspired artists, explorers, and adventurers for centuries. These towering natural wonders shape our landscapes and tell stories of time, weather, and geology. Whether you want to capture the majesty of the Rocky Mountains, the mystery of the Himalayas, or the beauty of the Alps, learning how to draw mountains is a great way to enhance your artistic skills.
In this guide, we’ll take you through a simple, step-by-step process to draw realistic mountains. But before we start sketching, let’s explore some fascinating facts about mountains and why they have captivated people throughout history.
Amazing Facts About Mountains
- Mount Everest, the world’s tallest mountain, stands at 29032 feet (8.85 km) above sea level. However, it is still growing by a few millimeters each year due to tectonic activity!
- The Rocky Mountains, stretching across North America, are home to diverse wildlife, including bears, elk, and mountain goats.
- Mount Fuji, Japan’s most famous mountain, is an active volcano and a sacred site in Japanese culture, inspiring countless paintings and poems.
- The Andes Mountains in South America form the longest continental mountain range in the world, spanning over 4300 miles (6,920.18 km).
- The Alps, famous for their breathtaking views and ski resorts, were formed over 30 million years ago and are still evolving due to shifting tectonic plates.
Mountains are not just beautiful; they also play a crucial role in climate, ecosystems, and even human history. Now, let’s get ready to bring them to life on paper!
What You Need to Draw Mountains
Before we begin, gather the following materials to make your drawing experience smooth and enjoyable:
- Pencil – A standard graphite pencil (HB or 2B) is perfect for sketching the initial outlines.
- Eraser – To refine your drawing and fix any mistakes.
- Fine liner or black pen – For adding details and outlines.
- Colored pencils or markers – To bring your mountains to life with shades of gray, brown, blue, and green.
- Ruler – Useful for drawing the base of the mountains and keeping proportions balanced.
- Paper – Any sketchbook or drawing paper will work well.
Now that you’re prepared, let’s dive into the step-by-step tutorial and create your very own mountain landscape!
Time needed: 15 minutes
How to Draw Mountains
- Draw the First Mountain
Start by drawing a large triangle in the center of your paper. This will be the first and tallest mountain in your drawing. Try to make the sides slightly uneven to create a more natural look rather than a perfect geometric shape.

- Add More Mountains
Next, draw additional triangles on both sides of the first mountain. These will be the smaller mountains in the background. You can make some of them overlap slightly to create a sense of depth. The mountains don’t have to be the same size—varying their height will make the drawing look more realistic.

- Outline the Base and Add Clouds
At the bottom of the mountains, draw the horizontal line to create the ground. Then, add a few small, fluffy cloud shapes around the peaks of the mountains. These details will enhance the natural feel of the drawing.

- Add Cracks
Add a few cracks or sharp lines running down the slopes. These lines will give the mountains a rugged and rocky appearance.

- Sketch the Snowy Peaks
To make the mountains more interesting, draw jagged lines on the top parts of the peaks. These lines should look uneven and slightly cracked to represent snow-covered tops. This step adds texture and realism to the mountains.

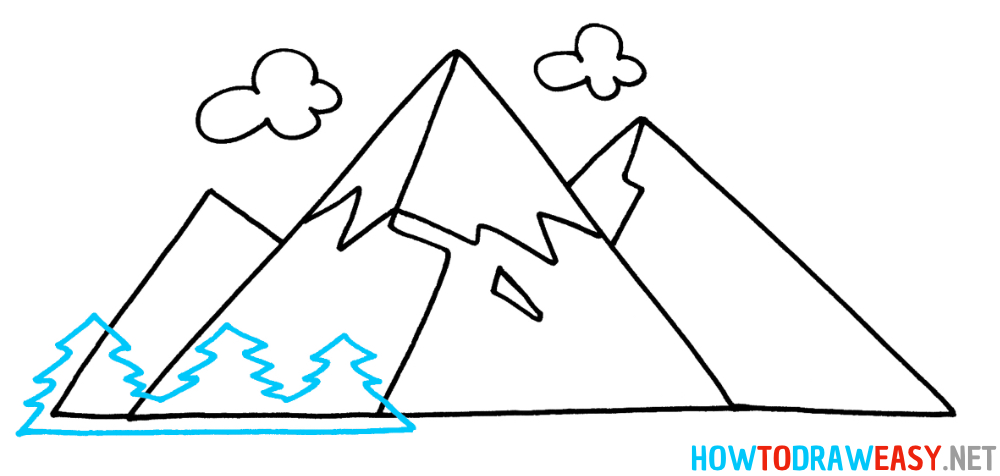
- Draw Trees at the Base
To make the landscape more lively, sketch small pine trees at the bottom of the mountains. The trees can be drawn as simple triangular shapes with jagged edges. Vary their size to create perspective—bigger trees in the foreground and smaller ones in the background.
- Add More Trees and Landscape Details
Continue adding trees along the bottom of the mountains. You can also add extra details like bushes, small hills, or even a river if you want to expand the scenery. This will make the drawing feel more complete.

- Color the Drawing
Finally, color your mountains! Shade the peaks with light gray or white for the snowy areas. Use darker shades for the rocky surfaces and a mix of green for the trees. If you want to add more depth, you can use different shades of blue and gray to show shadows.
Now your mountain landscape is complete! Keep practicing, and try experimenting with different shapes, sizes, and textures to create even more impressive mountain scenes.


Well done! You’ve successfully followed each step and created a beautiful mountain landscape. Whether this was your first time drawing mountains or you’ve done it before, every new drawing helps you improve your artistic skills. Now, let’s go over some final thoughts and ways you can take your artwork even further.
Enhance Your Mountain Drawing
Now that you’ve mastered the basics, here are a few ways to make your drawing even more stunning:
- Experiment with different shapes and styles – Mountains come in all forms, from sharp, jagged peaks to soft, rolling hills. Try drawing different mountain ranges to develop your unique style.
- Add details to create depth – Include more trees, rivers, or even a sunset to bring your scene to life. You can also experiment with shading to give the mountains a three-dimensional look.
- Use color creatively – Mountains aren’t just gray! In different lighting and seasons, they can appear blue, green, orange, or even purple. Try adding atmospheric colors for a more realistic effect.
Try More Fun Drawing Tutorials!
If you enjoyed drawing mountains, why not explore more step-by-step drawing lessons? HowToDrawEasy.net offers a variety of tutorials to help you improve your skills. Here are some you might love:
- How to Draw a Tree – Learn how to sketch different types of trees to complete your nature scenes.
- How to Draw the Earth – Sketch the Earth with us.
- How to Draw a House – Create a cozy cabin or a detailed home in your drawings.
- How to Draw a Wolf – Learn how to draw a majestic wolf roaming through the mountains.
- How to Draw a Sky – Capture the beauty of a setting sun with simple steps.
Check out these tutorials and continue your artistic journey!
Keep Practicing and Keep Creating!
Drawing is a skill that gets better with time and practice. The more you draw, the more confident and creative you’ll become. Don’t be afraid to make mistakes—every line you sketch is part of the learning process.
Thank you for following this tutorial, and we hope you continue exploring the world of drawing. Keep practicing, stay creative, and have fun!