
How to Draw Deadpool
Learn how to draw Deadpool with this easy step-by-step drawing tutorial. Follow 10 simple steps to create a dynamic sketch of Marvel’s iconic antihero!


Deadpool Drawing Tutorial – How to Draw Deadpool Step by Step
Deadpool, the infamous “Merc with a Mouth,” is one of Marvel’s most entertaining and unpredictable characters. With his sharp wit, impressive combat skills, and signature red-and-black suit, Deadpool has become a fan-favorite among comic book lovers. Whether you’re a beginner or an experienced artist, this Deadpool drawing tutorial will guide you through an easy, step-by-step process to create an awesome sketch of this iconic antihero.
Who is Deadpool? Fun Facts About the Merc with a Mouth
Before we jump into how to draw Deadpool, let’s explore some cool facts about this unique superhero:
- First Appearance – Deadpool made his debut in New Mutants #98 (1991), created by Rob Liefeld and Fabian Nicieza.
- Real Name – His real name is Wade Wilson, a former mercenary who was part of the Weapon X program.
- Healing Factor – Similar to Wolverine, Deadpool has an incredible healing ability, making him nearly impossible to kill.
- Fourth-Wall Breaking – Unlike most comic book characters, Deadpool frequently talks to the audience, breaking the fourth wall in a humorous way.
- Dual Katana and Firearms – Deadpool is an expert swordsman and marksman, often carrying two katana swords and a variety of guns.
Now that you know more about Deadpool, let’s move on to the materials you’ll need for this Deadpool drawing tutorial.
What You Need to Draw Deadpool
Before you start sketching, make sure you have the right drawing tools:
Essential Drawing Supplies
Pencil (HB or 2B) – for light sketching and outlining.
Eraser – to remove mistakes and refine details.
Black Ink Pen or Fineliner – for outlining and adding sharp details.
Colored Pencils or Markers – red, black, gray, and white for Deadpool’s costume.
Drawing Paper or Sketchbook – for smooth and easy sketching.
Once you have your supplies ready, let’s dive into the step-by-step process of how to draw Deadpool.
Why Draw Deadpool?
Deadpool is an awesome character to draw because of his:
- Dynamic and action-packed design – making him a great subject for artists who love superhero sketches.
- Expressive mask and body language – perfect for practicing character expressions without drawing facial features.
- Iconic red-and-black suit – allowing you to experiment with bold colors and shading techniques.
If you’re ready, follow our Deadpool drawing tutorial and bring this hilarious antihero to life on your page!
Time needed: 20 minutes
Merc with a Mouth Drawing Tutorial
- Sketch the Basic Shape of the Head
Start by drawing an oval shape for Deadpool’s head. Make sure the bottom of the oval is slightly narrower to match the shape of a human skull. Lightly sketch two small oval shapes for the eyes’ placement.

- Add Deadpool’s Mask Details
Inside the head shape, draw two almond-shaped eyes. Surround these eyes with larger, diamond-like shapes that extend towards the sides of the face. These black mask markings are one of Deadpool’s signature features.

- Outline the Torso and Arms
From the bottom of the head, sketch the upper body, forming broad shoulders and a muscular chest. Draw the outline of the arms extending outward. At this stage, the torso should look like a simplified superhero figure with a V-shaped bottom.

- Define the Arms and Gloves
Refine the arms by adding forearm divisions and drawing Deadpool’s gloves. His gloves extend slightly past the wrists, and the fingers should be well-defined but still in a relaxed pose.

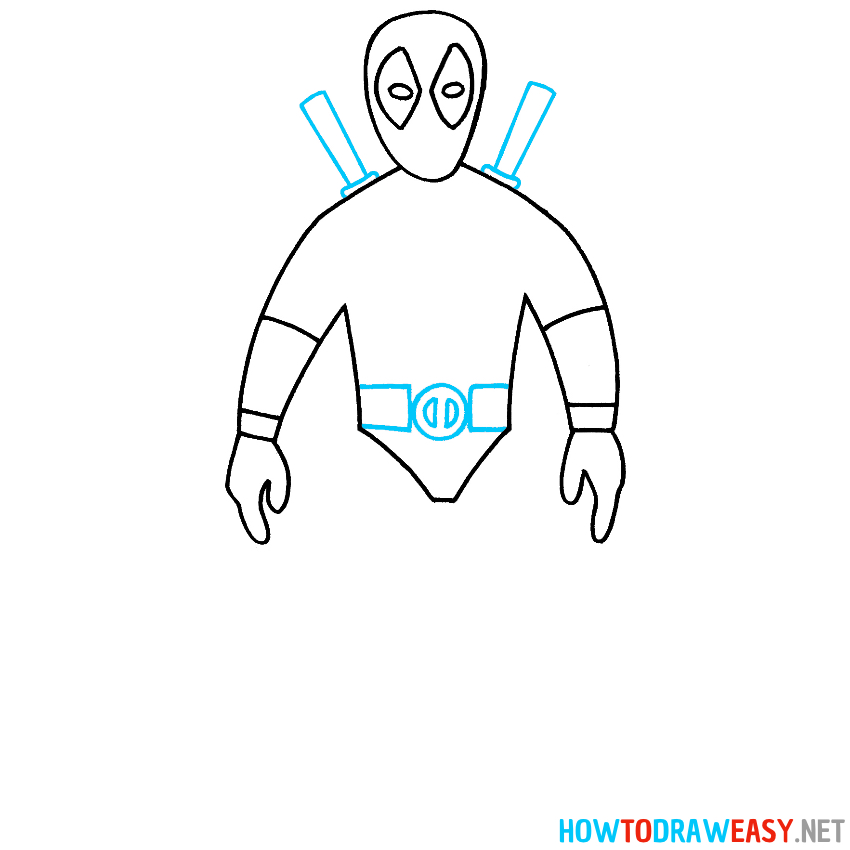
- Add the Utility Belt and Swords Hilts
Draw Deadpool’s signature utility belt with a circular buckle in the center, featuring the Deadpool logo. Then, sketch two sword handles sticking out from behind his back, crossing at an angle. These are his katana swords, a crucial part of his design.
- Add Chest and Abdominal Details
Now, refine Deadpool’s muscular structure by adding chest and abdominal muscle lines. Draw light, curved lines to indicate his well-defined physique. This will add more depth and realism to the drawing. You also need to add the lines of the suit and draw the holsters for the guns.

- Draw the Leg Holsters and Accessories
Sketch the holsters for Deadpool’s weapons, which are attached to his thighs. These holsters should be rectangular in shape and positioned symmetrically on both legs. Add small straps around the upper thighs to secure them.

- Draw the Legs
Extend the drawing by adding Deadpool’s legs. Make sure they are proportionate to the upper body.

- Add the Details
Then, sketch his boots with subtle details, such as horizontal bands around the calves, to capture his comic-accurate costume. Go over your drawing with a darker, cleaner outline, removing any unnecessary sketch lines. Ensure all the details, from the mask to the utility belt and weapons, are clear and well-defined.

- Add Colors
Finally, color your drawing! Use red for the main suit, black for the mask markings, gloves, and boots, and gray for the weapons and utility belt. Add shading to enhance the depth and make Deadpool appear more dynamic and three-dimensional.


You’ve successfully completed this Deadpool drawing tutorial and created your very own sketch of Marvel’s most unpredictable antihero. Whether you’re a beginner or an advanced artist, drawing Deadpool is a fun and rewarding experience. Now, let’s go over some final thoughts, tips, and next steps to take your Deadpool artwork to the next level.
Reviewing Your Deadpool Drawing
Take a moment to look at your finished Deadpool drawing. Here are some key points to check:
Proportions – Are Deadpool’s head, torso, and limbs properly sized and balanced?
Details – Do the costume details, weapons, and accessories match his comic book appearance?
Shading and Color – Have you used shadows and highlights to make the drawing look more dynamic?
Linework – Are the outlines clean and well-defined?
If you notice any areas that could be improved, don’t worry! Even professional artists refine their work multiple times.
Tips for Improving Your Superhero Drawings
1. Experiment with Different Poses
Now that you know how to draw Deadpool, try drawing him in different action poses, such as:
- Holding his katanas in battle stance
- Leaping into action
- A funny Deadpool moment, breaking the fourth wall
2. Add More Details to the Costume
Deadpool’s suit has various textures and accessories, such as:
- Utility pouches
- Tactical gear
- Extra weapons
Adding these small details will make your drawing even more authentic and dynamic.
3. Try Different Art Styles
Once you’ve mastered the classic comic book style, experiment with:
- Chibi Deadpool (cute and exaggerated proportions)
- Realistic Deadpool (detailed shading and anatomy)
- Cartoon-style Deadpool (simplified and expressive features)
What’s Next? Keep Practicing!
Drawing superheroes is a great way to improve your art skills. Now that you’ve finished this Deadpool drawing tutorial, here are some ideas for your next steps:
Draw Other Marvel Characters – Try sketching Spider-Man, Wolverine, or Iron Man.
Create a Full Deadpool Scene – Add a background or other characters for a complete comic-style artwork.
Learn More Drawing Techniques – Study anatomy, perspective, and inking to enhance your comic book art.
Conclusion
Deadpool is a fantastic character to draw because of his dynamic design, bold costume, and fun personality. By following this step-by-step Deadpool drawing tutorial, you’ve gained the skills to create an impressive superhero sketch. Keep practicing, have fun, and don’t be afraid to experiment with new techniques.
Want more tutorials? Check out our other superhero drawing guides and take your comic book art to the next level!