
How to Draw a Chair
Learn how to draw a chair step by step with this easy drawing tutorial. Perfect for beginners and kids, follow simple instructions to create your own chair illustration!


How to Draw a Chair – Easy Step-by-Step Guide
Chairs are an essential part of everyday life, yet we often overlook their fascinating history and design. From ancient thrones to modern ergonomic seats, chairs have evolved in incredible ways over the centuries. In this step-by-step tutorial, you will learn how to draw a chair easily, making it perfect for beginners and kids. But before we begin, let’s explore some interesting facts about chairs that might inspire your drawing!
A Brief History
Did you know that chairs were once considered a symbol of power and prestige? In Ancient Egypt, Greece, and Rome, only rulers and high-ranking officials had the privilege of sitting on chairs, while common people sat on stools or benches. During the Renaissance period, chairs became more accessible, evolving into a standard piece of furniture in homes. Today, chairs come in countless styles, from classic wooden designs to ultra-modern ergonomic office chairs.
The Science Behind a Comfortable Chair
Have you ever wondered why some chairs feel more comfortable than others? The key lies in ergonomics, the science of designing furniture to support the human body. A well-designed chair provides proper back support, reduces strain on the spine, and improves posture. That’s why office chairs often have adjustable features, like lumbar support and armrests, to ensure maximum comfort. When drawing a chair, you can think about how different designs offer varying levels of comfort and functionality.
In Art and Design
Throughout history, chairs have also been a popular subject in art. Famous artists like Vincent van Gogh and Pablo Picasso have included chairs in their paintings, turning simple furniture into meaningful symbols. In design, chairs often reflect the culture and style of an era. For example, the Eames Lounge Chair, designed in the 1950s, is still considered a masterpiece of modern furniture design.
Fun Facts to Inspire Your Drawing
- The world’s oldest known chair dates back over 5,000 years to Ancient Egypt.
- The rocking chair was invented in the early 18th century and became popular in America thanks to Benjamin Franklin.
- Some chairs are designed for specific purposes, like gaming chairs, reclining chairs, and even massage chairs.
- The tallest chair ever made was over 65 feet high and was built as a giant sculpture in Switzerland.
Now that you know more about the history and design of chairs, it’s time to create your own drawing! Follow the step-by-step guide below to learn how to draw a simple but realistic chair. Whether you want to sketch a classic wooden chair, a stylish modern seat, or even a throne fit for a king, this tutorial will help you develop your drawing skills. Grab your pencil and let’s get started!
Time needed: 15 minutes
Chair Step-by-Step Instructions
- Draw the Seat
Start by drawing the base of the chair—its seat. Sketch a trapezoid shape where the top line is slightly shorter than the bottom line. This will create a sense of perspective, making the drawing look more realistic.

- Add the Back
From the back corners of the seat, draw two vertical lines extending upward. These will form the backrest. Keep the lines parallel and slightly curved for a more natural look.

- Sketch the Backrest Slats
Add three evenly spaced horizontal lines between the two back legs. These will act as the slats of the chair’s backrest, giving it a classic wooden design.

- Add Thickness to the Seat
Draw an additional horizontal line underneath the seat to give it more depth. This makes the chair look more sturdy and three-dimensional.

- Draw the Front Legs
Extend two vertical lines downward from the front corners of the seat. These will be the front legs of the chair. Try to keep them proportional to the back legs for balance.

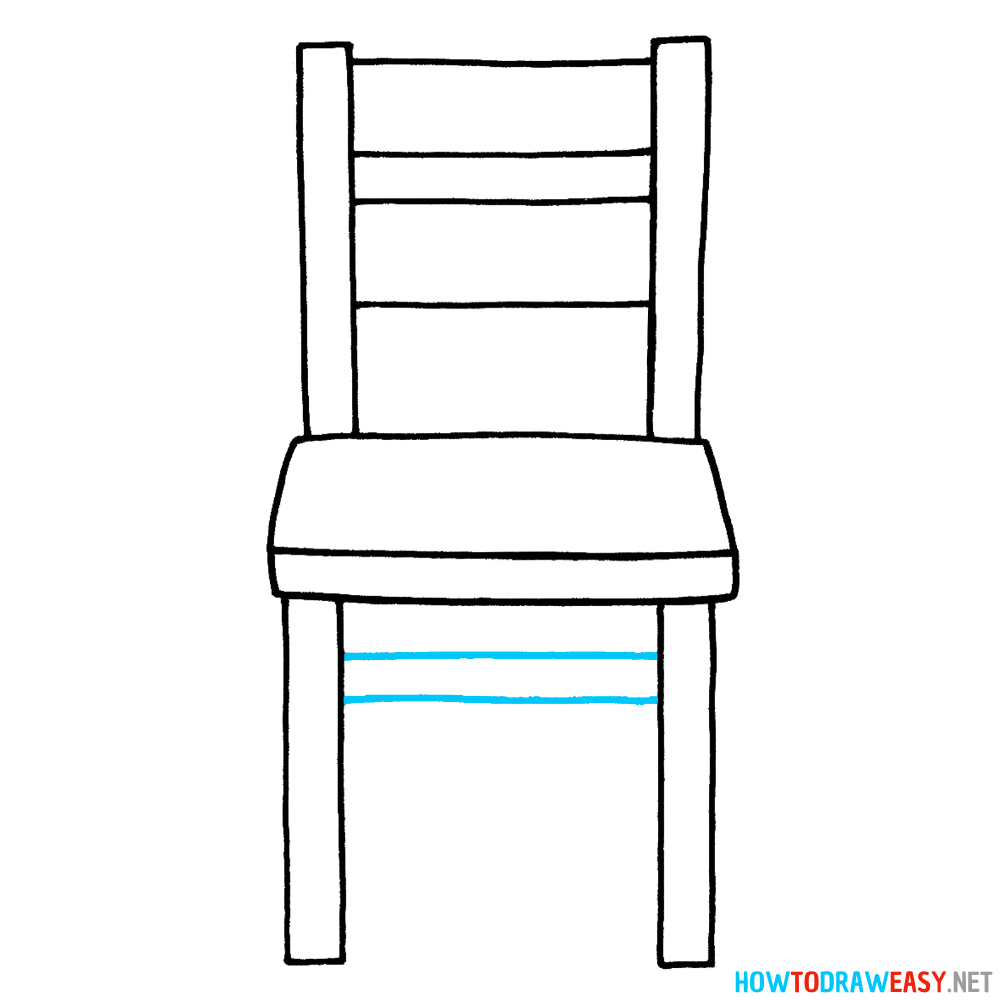
- Add Support Bars for Stability
Draw horizontal bars connecting the front and back legs on both sides. These bars add structure and stability to the chair.
- Finalize the Shape
Following the example from the step, draw the back legs of the chair using straight lines.

- Color the Chair
Finally, bring your drawing to life by adding colors. Use brown shades for the wooden frame and red for the seat cushion to match the example. Feel free to use different colors to personalize your chair!
Now you have a complete drawing of a chair!


Congratulations! You’ve successfully learned how to draw a chair step by step. This simple yet essential piece of furniture is a great way to practice perspective, proportions, and line work. Whether you want to draw a classic wooden chair, a modern office seat, or even an antique throne, mastering this basic design will help you improve your overall drawing skills.
If you enjoyed this tutorial, don’t stop here! Explore more step-by-step drawing guides on HowToDrawEasy.net and keep developing your artistic abilities. Check out these fun and easy lessons:
- How to Draw a Table – A perfect companion to your chair drawing! Learn how to sketch a simple table with easy steps.
- How to Draw a Sofa – Want to add more furniture to your drawings? Try sketching a cozy sofa.
- How to Draw a House – Take your furniture drawings to the next level by placing them inside a beautifully drawn house.
- How to Draw a Car – Looking for something different? Learn how to sketch a car with simple shapes and lines.
Keep practicing, have fun, and stay creative! Don’t forget to check back for more exciting drawing tutorials on HowtoDrawEasy Happy drawing!