
How to Draw Deku
Learn how to draw Deku from My Hero Academia with this easy step-by-step guide. Perfect for beginners and anime fans!


The Story
If you’re a fan of My Hero Academia, you probably love Izuku Midoriya, better known as Deku. He’s one of the most inspiring anime characters, starting as a Quirkless boy and growing into a powerful hero. Before we dive into how to draw Deku, let’s explore his backstory and why he’s such a beloved character.
Deku’s Journey: From Quirkless to Hero
Deku was born in a world where almost everyone has a superpower, known as a Quirk. Unfortunately, he was one of the rare kids who had no powers at all. Despite this, he always dreamed of becoming a hero like his idol, All Might.
His life changed when he showed incredible bravery by trying to save his childhood friend Bakugo from a villain. This act caught the attention of All Might, who saw potential in Deku and decided to pass on his powerful Quirk, One For All. With this new ability, Deku began his journey to becoming the greatest hero of all time.
Deku’s Unique Look and Personality
Deku’s design reflects his personality—determined, kind, and always willing to fight for justice. His messy green hair, expressive big eyes, and signature hero costume make him instantly recognizable. Whether he’s wearing his UA High School uniform or his battle suit, Deku always stands out as a true anime icon.
His personality is a mix of intelligence, kindness, and never-give-up spirit. He constantly analyzes fights, takes notes, and improves his abilities, making him a favorite among anime fans.
Why Draw Deku?
Deku is not just fun to watch—he’s also a fantastic character to draw! His spiky hair, dynamic facial expressions, and heroic stance make for an exciting sketching challenge. Whether you’re a beginner or an experienced artist, learning how to draw Deku will help you improve your anime drawing skills.
Ready to bring this legendary hero to life? Let’s get started with our step-by-step guide!
Tools You’ll Need for Your Fairy Drawing
Before we start, gather the right tools to make your drawing process smooth and enjoyable:
- Pencil – A basic sketching pencil (HB or 2B) for outlining your fairy.
- Eraser – To correct mistakes and refine your lines.
- Fine-tip black pen or marker – For outlining the final drawing.
- Colored pencils, markers, or watercolors – To bring your character to life with vibrant colors.
- Sketchpad or drawing paper
Time needed: 25 minutes
How to Draw Deku
- Draw the Head Shape
Start by sketching the outline of Deku’s face. Draw a slightly rounded shape with a more angular chin. Then, add two curved lines for the upper part of the eyes.

- Add Facial Features
Inside the face, draw Deku’s large round eyes, small nose, and smiling mouth. Add pupils to the eyes.

- Detail the Head
On both sides of the head, draw Deku’s ears, making sure they align with his eyes. Then, sketch the short neck beneath his chin. Add small highlights in his eyes to give them a more expressive look, and add freckles as in the example.

- Sketch the Hair Outline
Deku’s hair is wild and spiky. Begin by drawing rough, jagged spikes all around his head. His hair is messy, so make the spikes uneven for a more natural look.
Add inner details to the hair, including smaller zigzag lines to show depth and texture. This will make Deku’s hair look more voluminous.
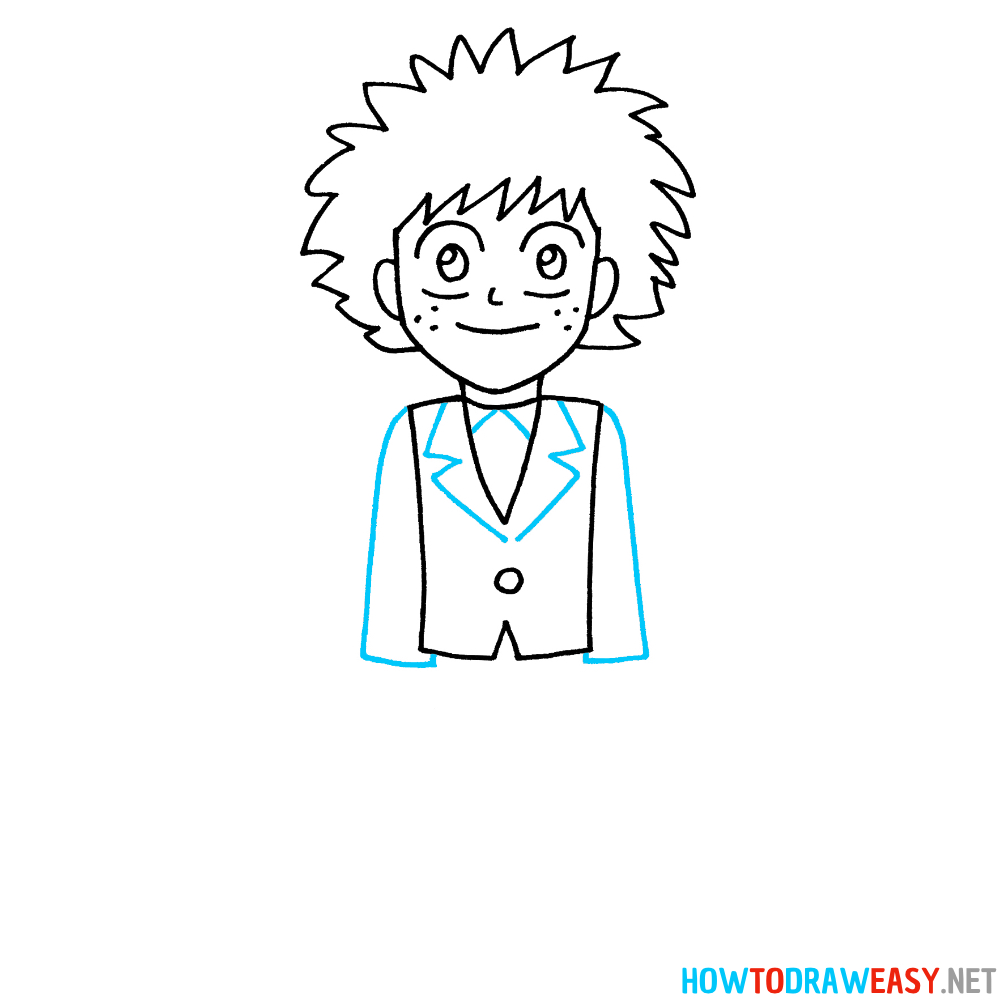
- Draw the Upper Body (Jacket Base)
Now, sketch the basic shape of Deku’s torso. Draw a V-neck outline for his school uniform jacket. Then, add the small button in the center.

- Add the Suit Details
Outline the collar and lapels of Deku’s jacket. Sketch Deku’s arms extending downward, with sleeves slightly flaring at the wrists.
- Add Costume Details and Pants
This step shows you how to draw a tie, and also draw the cuffs and add simple stripes for detailing the suit. Then, sketch his legs, ensuring they are proportionate to his upper body.

- Draw Shoes and Hands
Draw Deku’s hands in fists, showing his determined personality. Complete the basic shapes by adding the shoes.

- Detail the Shoes
In this step, use the example and detail Deku’s shoes by adding shoelaces and a sole.

- Finalize and add Colors
Finally, color your drawing:
— Green hair
— Gray school jacket
— Dark green pants
— Red shoes
And that’s it! You’ve successfully drawn Deku from My Hero Academia. Keep practicing, and soon you’ll master drawing anime characters!


Congratulations! You’ve successfully completed this step-by-step tutorial on how to draw Deku from My Hero Academia. Whether you’re a beginner or an experienced artist, drawing Izuku Midoriya is a great way to practice anime-style illustrations and improve your sketching techniques.
By following these steps, you’ve learned how to create Deku’s iconic hairstyle, expressive eyes, and heroic stance. But don’t stop here! Keep practicing different poses, facial expressions, and even his hero costume to refine your skills further. The more you draw, the better you’ll get at capturing his determined and courageous personality on paper.
Explore More Drawing Tutorials on HowToDrawEasy.net!
If you enjoyed this Deku drawing tutorial, there’s a vast array of other lessons waiting for you. At HowToDrawEasy.net, we offer a diverse collection of step-by-step guides across various themes to help you enhance your artistic skills. Here are some tutorials you might find interesting:
- How to Draw Mountains: Master the art of landscape drawing with this guide to sketching realistic mountains.
- How to Draw a Guitar: Capture the intricate details of a guitar, perfect for music enthusiasts.
- How to Draw a Kitten: Create an adorable kitten drawing with easy-to-follow steps.
- How to Draw a Bow: Learn to draw a decorative ribbon bow, ideal for embellishing your artwork.
These tutorials cater to various interests and skill levels, ensuring there’s something for everyone. Visit HowToDrawEasy.net to access these lessons and many more. Keep practicing, stay creative, and continue your artistic journey with us!
Share Your Art!
We’d love to see your Deku drawings! Feel free to share your artwork online and tag us so we can feature your creations. Keep practicing, stay creative, and most importantly—have fun drawing!
See you in the next tutorial!