
How to Draw a Bow
Learn how to draw a ribbon bow step by step with this simple guide. Follow these easy instructions to create your own bow, perfect for beginners!


Bows have long been a symbol of elegance, decoration, and celebration. Whether it’s a bow on a gift box, a fashion accessory, or a decoration on holiday wreaths, their versatility, and beauty have made them a beloved design element. In this tutorial, we’ll teach you how to draw a bow in a simple and easy-to-follow way, perfect for beginners and aspiring artists alike. Not only will this step-by-step lesson help improve your artistic skills, but it will also inspire your creativity.
What is a Bow?
A bow is a decorative knot that has loops on both sides, often tied with fabric or ribbon. The design is symmetrical and visually appealing, making it a popular choice for decorating gifts, clothing, hairstyles, and even home décor. Bows can be created from a variety of materials, including silk, satin, velvet, or even paper. These materials often add texture and shine, making the bow stand out.
Historically, bows have been used in different cultures for centuries. They symbolized love, beauty, and sophistication, often appearing in art, fashion, and traditions. Today, the bow is a universal icon of festivity, used in everything from weddings to holiday decorations. Learning how to draw a bow not only enhances your art skills but also connects you to this rich cultural tradition.
A Little History of the Bow
The tradition of tying bows dates back centuries, with its roots in European fashion and gift-giving culture. In the 17th and 18th centuries, bows became a popular accessory in clothing, symbolizing wealth and sophistication. Over time, bows evolved into versatile decorations used in various aspects of life, from festive events to personal style. Today, bows remain a timeless design loved for their simplicity and elegance, making them an essential element in art and design.
Materials Needed for Drawing a Bow
To create your bow drawing, you don’t need a lot of supplies. Here’s a list of what you’ll need:
- Drawing paper: A smooth sheet works best for clean lines.
- Pencil: A standard HB pencil is perfect for sketching.
- Eraser: Use a soft eraser to remove any unwanted lines.
- Black pen or marker: To outline and define the shape of the bow.
- Coloring tools: Colored pencils, markers, or crayons for adding color to your design.
Optional materials include a ruler to help with symmetry or a blending tool for shading and adding depth.
Why Learn to Draw a Bow?
Drawing a bow may seem simple at first glance, but it’s an excellent way to practice symmetry, proportions, and details. This lesson teaches you how to focus on basic shapes, combine them, and add texture for a finished design. Once you master the basics, you can experiment by adding patterns, different shapes, or unique designs to your bow.
This skill can be used in various projects, such as creating handmade cards, designing gift tags, or even decorating your journals and planners. Drawing a bow is a small but creative step into a larger world of art and design.
Tips for Beginners
If you’re new to drawing, take your time with each step. Don’t worry about making your lines perfect right away; the key is to practice and improve over time. Use light strokes with your pencil so you can easily erase any mistakes. Most importantly, have fun with the process!
This tutorial is beginner-friendly, and each step is broken down to make it easy to follow. Start by sketching lightly with your pencil so you can erase mistakes without hassle. Don’t rush the process—focus on each section before moving on to the next. And most importantly, enjoy the journey of creating your very own bow illustration!
Now that you know the basics and have all your tools ready, let’s dive into the step-by-step guide and learn how to draw a bow effortlessly!
Once you finish this tutorial, feel free to check out other lessons on HowtoDrawEasy.net, where you’ll find more creative drawing guides for all skill levels. Keep practicing, and soon you’ll be drawing like a pro!
Time needed: 15 minutes
How to Draw a Bow
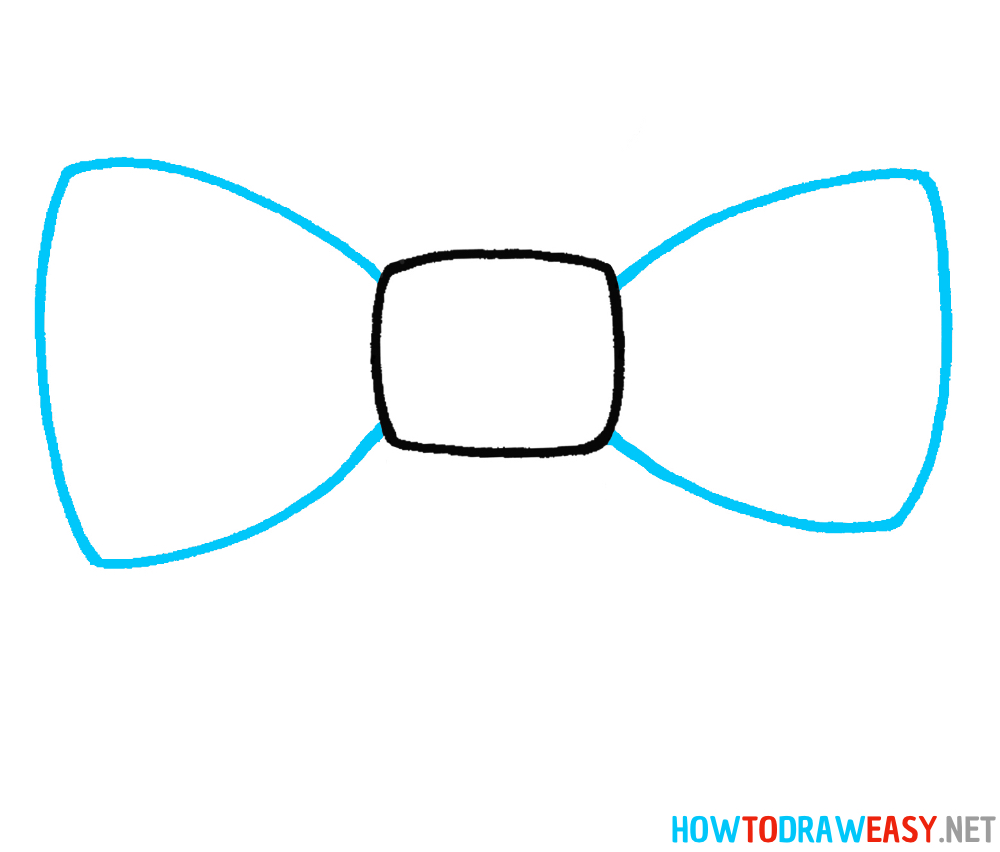
- Draw the Bow’s Center
Begin with the main element of your bow — its center. Draw a rectangle in the middle of your paper, making sure it’s straight and symmetrical. This rectangle will serve as the knot of the bow and is the focal point that ties all parts together. Ensure the size is proportional to leave room for the loops and tails that come next. Press lightly with your pencil so you can easily adjust the lines if needed.

- Add the Main Loops of the Bow
On both sides of the rectangle, draw large, curved shapes that will form the main loops of the bow. Each loop should have smooth and symmetrical outlines. Start your lines at the edges of the rectangle and curve them outward, connecting them back near the knot to create soft oval or rounded triangular shapes. Make sure both loops are the same size and shape to maintain balance and make the bow look neat.
- Details of the Loops
Go back to the loops and add inner lines to give them more depth and a realistic appearance. Draw additional lines starting from the center of the bow (the rectangle) and extend them towards the inner edges of the loops. These lines will simulate the folding and creasing of fabric. Keep the spacing between these lines consistent for a polished and orderly look. This step helps create the impression of soft, folded material.

- Draw the Hanging Tails of the Bow
Add long ribbon tails hanging down from the bow. Draw two ribbons starting from the bottom of the knot and angling slightly outward. At the bottom of each ribbon, create a decorative “V” cut to make them look like real ribbon ends. Ensure both tails are the same length and width for a balanced and cohesive appearance. These tails will complete the bow’s shape and add elegance to your drawing.

- Outline and Color the Bow
Once all the main parts are drawn, trace over the lines with a liner, black pen, or marker to make them clean and defined. This step will give your drawing a polished look, ready for coloring. Make sure all lines are smooth and continuous. Erase any leftover pencil sketches to keep your drawing neat. This step also prepares your bow drawing for the final stage — adding color.
Traditionally, bows are colored red, but feel free to use any shade that suits your style or preference. Consider making the center knot slightly darker than the loops and tails to create contrast. Add shadows and highlights to give the bow depth and texture, making it look more three-dimensional. With this last step, your bow drawing is complete and ready to shine!


Conclusion: Mastering the Art of Drawing a Bow
Congratulations on completing your bow drawing! A bow is not only a beautiful design but also a versatile symbol of celebration, elegance, and creativity. Whether you’re creating this piece as a standalone illustration or using it as part of a larger artwork, it’s an excellent way to enhance your drawing skills and explore new techniques. Let’s wrap up this tutorial with some final thoughts, tips, and inspiration for your future projects.
The Importance of Practice
As with any art form, practice is key to mastering the art of drawing. Don’t worry if your first attempt didn’t turn out as you expected—every artist improves with time and effort. Use this tutorial as a foundation and try drawing bows in different shapes, sizes, and colors. Experiment with textures, such as adding patterns like polka dots or stripes, to make your bow unique. Remember, the more you draw, the better your technique will become.
Creative Ways to Use Your Bow Drawing
Your bow drawing doesn’t have to stay on the page! You can use it for gift card designs, handmade decorations, or digital artwork. If you’re into crafting, turn your drawing into a template for making paper or fabric bows. You could also use it as a design element for holiday cards, birthday invitations, or any other creative project. Bows are a versatile motif that fit perfectly into various themes and occasions.
Explore More Tutorials on HowToDrawEasy.net
If you enjoyed learning how to draw a bow, why not expand your skills with other fun tutorials? HowToDrawEasy.net offers a wide range of step-by-step guides for beginners and experienced artists alike. From drawing flowers and animals to objects and characters, there’s something for everyone. Here are a few lessons you might find interesting:
- How to Draw a Gift Box: Perfect for pairing with your bow!
- How to Draw a Banner: Draw a cute banner for your gifts.
- How to Draw a Flower Bouquet: Create an elegant combination of flowers and bows.
Visit HowToDrawEasy.net to find these tutorials and many more. Each guide is simple, clear, and designed to help you improve your skills at your own pace.
Every artist begins somewhere, and your journey has taken another step forward today. Drawing a bow might seem simple, but it’s a great exercise in symmetry, proportions, and creativity. Don’t hesitate to revisit this guide whenever you need to refresh your technique or create something new.
Remember, art is about expressing yourself. So, have fun, experiment, and never be afraid to make mistakes. Each stroke of the pencil is a step closer to mastering your craft. Keep creating, and we look forward to seeing you back at HowToDrawEasy.net for more inspiring lessons. Happy drawing!