
How to Draw a Family Tree
Learn how to draw a family tree with this easy step-by-step guide. Create a beautiful representation of your family history while improving your drawing skills. Perfect for beginners and anyone looking to make a meaningful, creative project to cherish forever!


A family tree is more than just a drawing; it’s a visual representation of your family’s history and connections. Learning how to draw a family tree is a creative and meaningful way to celebrate your family’s story. This timeless illustration helps us understand where we come from, build a sense of belonging, and preserve memories for future generations. Whether you’re a child exploring your roots or an adult creating a legacy for your loved ones, drawing a family tree is a rewarding project that combines art and storytelling.
A family tree serves as a tool for education and connection. It allows you to visually represent generations of relatives, honor the people who shaped your family’s history, and even teach younger members about their heritage. By crafting this tree with your own hands, you add a personal touch, transforming it into a keepsake that can be cherished for years to come.
What You’ll Need for This Lesson
Before we begin this artistic journey, let’s make sure you have the necessary tools to create your masterpiece:
- A pencil for sketching the basic outlines and shapes.
- An eraser to fix any mistakes as you refine your drawing.
- Black pen or marker to trace over the final lines and make your design bold and clean.
- Colored pencils or markers to bring your family tree to life with vibrant shades of brown, green, and accent colors.
- Paper or drawing pad, preferably thicker paper if you plan to display your tree.
With these tools in hand, you’re ready to start designing a beautiful family tree that reflects your unique style and creativity.
Tips for Beginners
If you’re new to drawing, don’t worry—this lesson is designed for artists of all levels. Remember, the key to improving your skills is patience and practice. Start with light pencil strokes, so it’s easier to erase any lines you want to adjust. Don’t focus on perfection; instead, enjoy the process and let your creativity flow.
When designing your family tree, think about the personal touches you’d like to include. Would you like to add decorative elements like flowers or leaves? How about unique shapes for each branch to reflect your family’s personality? Feel free to make this project your own.
And most importantly, don’t be discouraged if your first attempt doesn’t look exactly as you imagined. Every artist starts somewhere, and every drawing you create brings you closer to mastering your craft. Embrace the journey, and let your family tree become a beautiful reflection of your artistic growth.
Now that you understand the significance of a family tree, have gathered your supplies, and are equipped with helpful tips, it’s time to begin your step-by-step lesson. Let’s start creating your family tree and bring your family’s history to life on paper!
Time needed: 20 minutes
How to Draw a Family Tree
- Draw the Tree Trunk
Start by creating the base of the family tree — draw a simple rectangle with a slight widening at the bottom. This will be the tree trunk that supports the entire composition. Make sure the trunk looks stable by slightly expanding it towards the base. Keep your lines soft, so you can add more details later. Avoid pressing too hard with the pencil, as this is just the foundation.

- Add the Branches
Extend a few smooth, curved lines upward from the top of the trunk to create the main branches of the tree. These lines should be wider at the base and taper towards the ends. Try to make the branches symmetrical, so the tree looks balanced. These branches will serve as the structure for placing the elements of the family tree.

- Create the Tree Crown
Draw a large, rounded shape around the branches to represent the crown of the tree. Make it slightly wavy to give it a natural look, resembling foliage. The crown should fully encompass the top part of the branches. This area will later be filled with elements such as name frames and portraits.

- Place the Frames
Add one or more rectangular frames on each of the main branches of the tree. These frames will be used to write the names of family members. Distribute them evenly, so the tree looks organized and balanced. Ensure that the frames are centered within the crown and follow the direction of the branches.

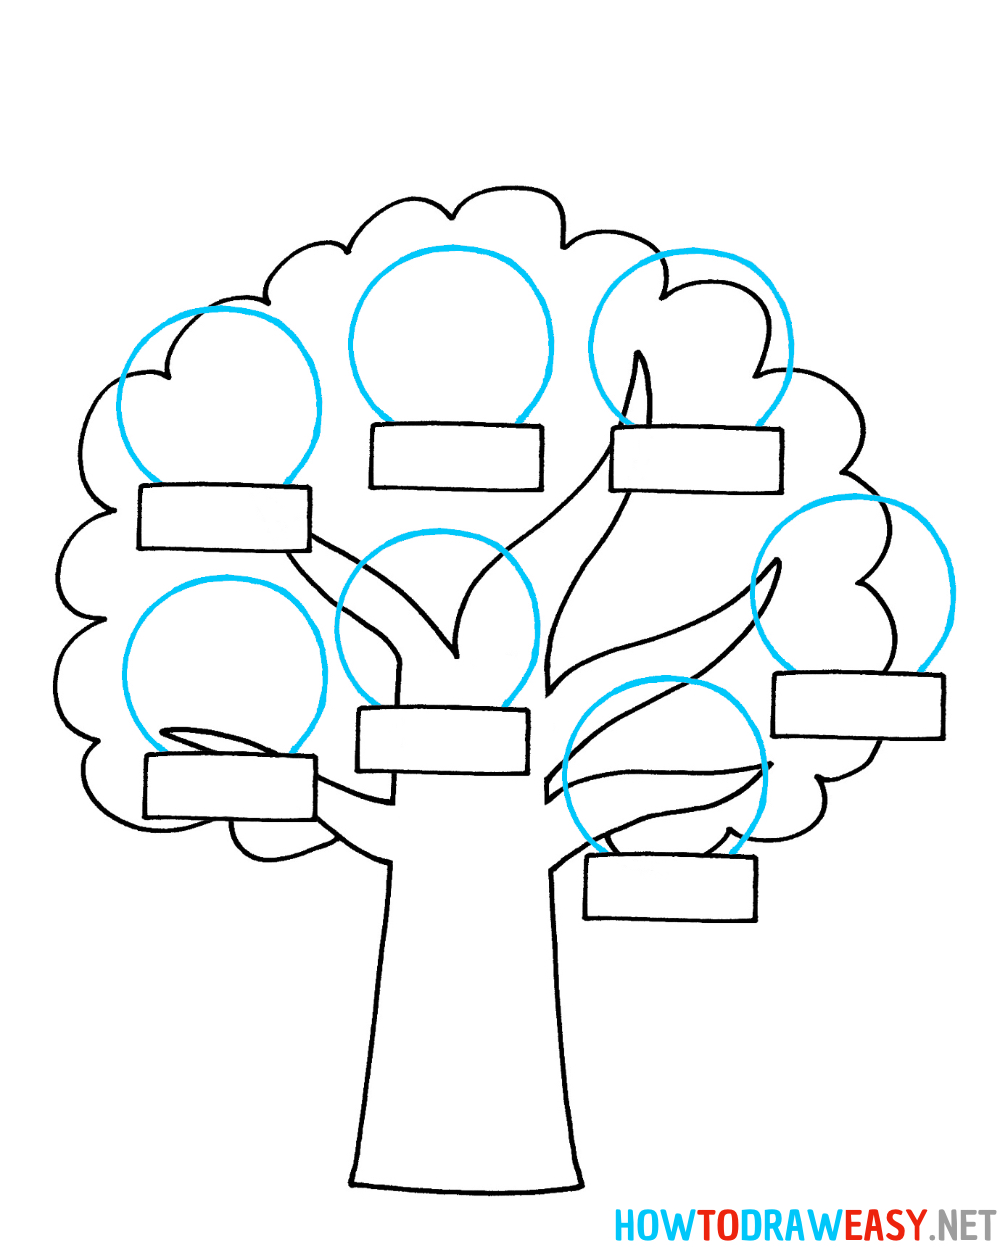
- Add Portraits
Draw circular outlines around the frames, which will serve as spaces for portraits or symbols of family members. These circles should be proportional to the frames to create a harmonious composition. Each circle should fit neatly into the space between the branches. Try to make them even and consistent in size.
- Refine the Tree Details
Trace over the lines of the frames and circles to make them more defined. Add a small ribbon or decorative element at the top of the crown. This element can be used as a space for the family tree’s title or family motto. Don’t forget to add small lines or textures to the trunk and branches to make the tree look more realistic.

- Prepare for Coloring
Check all the lines and erase any unnecessary pencil marks with an eraser. Make the strokes clean, so the drawing looks neat and ready for coloring. At this stage, you can also add small decorative elements like leaves or patterns. Prepare the drawing to look complete, but leave it uncolored for now. Additionally, as shown in the example, add the side parts of the banner.

- Color the Tree
Use colored pencils or markers to bring the family tree to life. Color the trunk and branches brown and the crown green. Highlight the frames and ribbons with other colors, such as yellow or blue. Add shading and textures to make the drawing more detailed and visually appealing.


Congratulations! You’ve successfully created your family tree, a drawing that’s more than just art—it’s a heartfelt representation of your family’s history and connections. This lesson helped you improve your artistic skills while creating a meaningful project that bridges generations. A family tree isn’t just a picture; it’s a way to honor your ancestors, celebrate your family’s story, and share it with loved ones.
Why It Matters
Drawing a family tree is more than a creative exercise—it’s an opportunity to connect with your roots, explore your family’s history, and preserve those stories for future generations. This artwork can become the centerpiece of your family archive, a unique gift for relatives, or a beautiful decoration in your home. Every name and line in your tree holds a special meaning, making it a timeless piece of your family’s legacy.
Helpful Tips
If you’d like to take your family tree to the next level, consider adding more details. For example, include small symbols or illustrations that represent your family, or write important dates like birthdays and anniversaries. You could also digitize your drawing by scanning it and adding names or photos using graphic design software. This way, you’ll have a professional-looking keepsake to share with others.
Other Drawing Lessons You’ll Love on HowToDrawEasy
If you enjoyed this lesson, check out these step-by-step tutorials to expand your skills and try something new:
- How to Draw a Tree Step by Step: Learn to draw different types of trees with simple and engaging instructions.
- How to Draw a House: A fun tutorial that shows you how to sketch a cozy house for your creative projects.
- How to Draw a Book: Practice drawing everyday objects with this straightforward guide.
- How to Draw a Heart: Perfect for creating meaningful and love-inspired artwork.
These tutorials are designed for artists of all skill levels, making them a great way to explore new techniques and grow your confidence.
See you soon!
Remember, drawing is not just about technical skills—it’s about expressing yourself and enjoying the creative process. Every new project is an opportunity to learn and add your unique style to your work. Your family tree isn’t just a drawing; it’s a piece of history that you’ve brought to life with your own hands.
We hope this lesson inspired you to keep exploring the world of art and try new ideas. Thank you for choosing HowToDrawEasy.net, and we look forward to seeing your next creations. Happy drawing!