
How to Draw a Diamond
Learn how to draw a diamond step by step with this simple guide. Follow these easy instructions to create your own adorable diamond, perfect for beginners and artists of all ages!


Welcome to this fun and easy tutorial on how to draw a diamond! Diamonds are not only a symbol of beauty and elegance, but also a fantastic subject for improving your artistic skills. Whether you’re a beginner or an experienced artist, learning how to draw this sparkling gem will help you practice precision, symmetry, and attention to detail. This step-by-step guide is designed to simplify the process, breaking it down into manageable steps so you can create a stunning diamond with ease.
Diamonds are often associated with brilliance and light reflection, making them a great challenge for anyone interested in capturing intricate shapes and angles in their art. By the end of this tutorial, you’ll be able to draw a diamond that shines with realism and detail, perfect for adding to your jewelry sketches, greeting cards, or any creative project.
Materials You’ll Need to Draw a Diamond
Before you get started, gather the following materials to ensure a smooth and enjoyable drawing experience:
- Pencil: Use a sharpened pencil for precise lines and easy adjustments.
- Eraser: A soft eraser is essential for cleaning up rough sketches or making corrections.
- Ruler: Symmetry is key when drawing a diamond, and a ruler will help you achieve clean, straight lines.
- Black Pen or Fine-Liner: Outline your drawing to make it stand out.
- Colored Pencils or Markers: Use light blue or gray shades to add a touch of color and realism to your diamond.
- Paper: Choose a clean sheet of drawing paper or sketchbook.
Why Learn How to Draw a Diamond?
Drawing a diamond is not just about creating an image; it’s about learning to break complex objects into simple geometric shapes. The process helps you develop essential artistic skills such as symmetry, shading, and composition. Plus, a beautifully drawn diamond can be used in various projects, from art portfolios to personalized designs for friends and family.
Whether you’re sketching for fun or honing your craft, this tutorial will guide you every step of the way. Let’s dive into the creative process and bring your diamond to life!
Time needed: 15 minutes
How to Draw a Diamond Step by Step
- Draw the diamond’s outline.
Start by sketching the basic shape of the diamond. Begin with a wide horizontal line at the top. From the ends of this line, draw two diagonal lines sloping downward, meeting at a point to form a triangle. This will be the lower part of the diamond. Then connect the diagonal lines back to the top with two shorter diagonal lines to form the top edge, creating the classic diamond outline.

- Add the top facet line.
Draw a horizontal line slightly below the top edge of the diamond. This line will represent the boundary between the upper facet and the rest of the diamond.

- Create triangular facets in the top section.
Inside the top section, draw three evenly spaced triangles. Each triangle starts from a point along the horizontal facet line and connects to the upper edge of the diamond. These will form the primary facets of the diamond’s crown.

- Draw connecting lines for the top facets.
Connect the points of the triangles to each other using diagonal lines to form smaller facets within the crown of the diamond. These connecting lines will give the diamond a more detailed and realistic appearance.

- Add main facets to the bottom section.
Move to the lower part of the diamond and divide it into three large sections. Draw two diagonal lines from the lower tip of the diamond to the points where the upper facet line meets the side edges of the diamond.

- Add secondary facets to the bottom section.
To make the lower part more intricate, add additional diagonal lines connecting the midpoints of the lower edges of each section. These lines create smaller triangular shapes, enhancing the complexity of the diamond’s reflection.

- Enhance the facets with finer details.
Add more lines within each triangular section, dividing the facets into smaller sections to replicate the brilliance and texture of a real diamond. This step gives the diamond its sparkling, multi-faceted appearance.
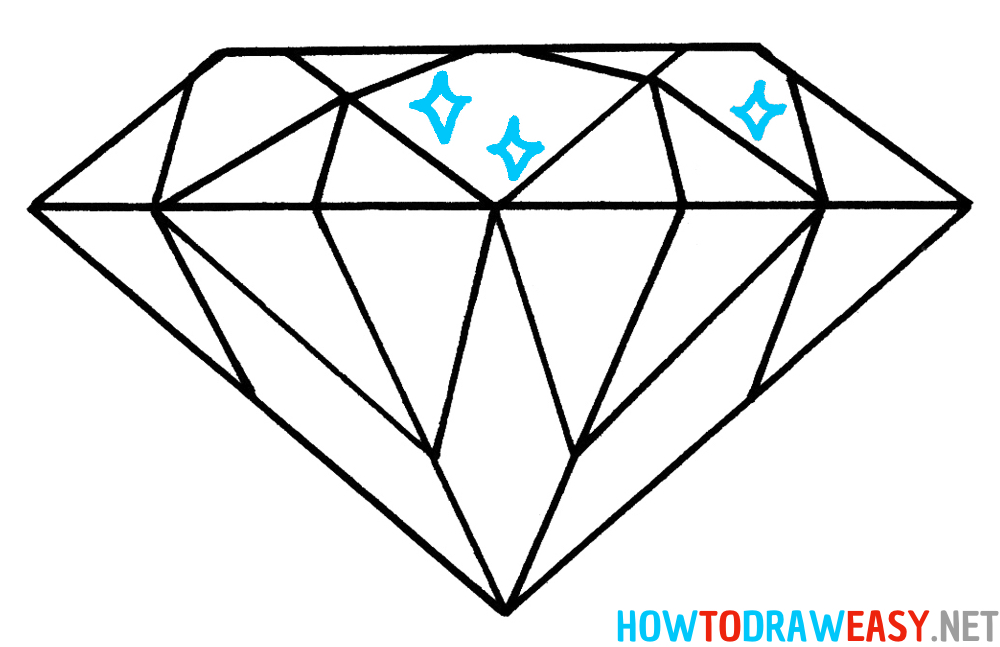
- Color the drawing.
Shade your diamond lightly with blue or gray tones to give it a transparent and reflective look. Add small sparkles or star shapes around the top facets to create the illusion of light glinting off the surface.


Congratulations on Drawing Your Diamond!
You’ve completed the tutorial and learned how to draw a diamond step by step! Your sparkling masterpiece is a great addition to your drawing skills and can be used in creative projects like cards, decorations, or even jewelry design concepts. We hope this guide helped you capture the brilliance and symmetry of a diamond with ease.
If you’re excited to explore more art tutorials, don’t stop here! Check out How to Draw a Solar System for another geometric and fun design, or learn How to Draw a Crown to complement your diamond sketch with royal flair. Want to try something adorable? Explore our guide on How to Draw a Teddy Bear for a charming and cozy addition to your drawings.
Visit HowToDrawEasy.net for hundreds of easy and inspiring drawing tutorials, perfect for beginners and artists of all ages. Keep practicing, and soon your art will shine as brightly as the diamond you just created!