
How to Draw Kakashi
Learn how to draw Kakashi with this step-by-step tutorial! Follow simple instructions to sketch and color Kakashi Hatake. Perfect for beginners!


How to Draw Kakashi Hatake – Step-by-Step Drawing Guide
Kakashi Hatake is one of the most beloved characters in the Naruto universe, known for his elite ninja skills, iconic Sharingan, and laid-back personality. Whether you’re a fan of the anime or just love drawing detailed characters, this guide will help you learn how to draw Kakashi Hatake step by step. By the end of this tutorial, you’ll have a fully illustrated drawing of the legendary ninja.
Who is Kakashi Hatake?
Kakashi Hatake is a Jonin-ranked ninja from the Hidden Leaf Village and the leader of Team 7, which includes Naruto Uzumaki, Sasuke Uchiha, and Sakura Haruno. He is widely recognized for his cool and mysterious personality, his signature face mask, and his ability to copy almost any jutsu using his Sharingan eye. Over the years, Kakashi has become one of the most popular anime characters, admired for both his combat skills and his wisdom.
Why Learn to Draw Kakashi?
Drawing Kakashi is a fantastic challenge for both beginners and experienced artists. His unique outfit, spiky hair, and battle-ready stance make him an exciting subject to sketch. Plus, drawing characters from Naruto is a great way to improve your skills in anime-style art. If you’re ready to master the techniques needed to create an amazing Kakashi drawing, let’s get started!
Drawing Tools You’ll Need
Before you begin, make sure you have the right tools for the job. Having quality materials can make a big difference in how your drawing turns out. Here’s what you’ll need:
Essential Drawing Tools:
- Pencil (HB or 2B) – for sketching basic outlines
- Eraser – to correct mistakes and refine details
- Fine-tip black pen – for outlining the final drawing
- Colored pencils or markers – for adding color to your artwork
- Sketchbook or drawing paper – preferably smooth-textured for better pencil control
Optional Tools for Advanced Artists:
- Blending stump – for soft shading effects
- White gel pen – for adding highlights to the eyes and hair
- Tablet or drawing app – if you prefer digital drawing
By the end of this tutorial, you’ll have a complete Kakashi drawing that captures his signature look and ninja essence. Grab your drawing tools and let’s get started!
Time needed: 20 minutes
How to Draw Kakashi from Naruto
- Draw the Base Face Shape
Begin by drawing an oval-like shape for Kakashi’s face. His face is slightly angular, so make sure to shape the jawline accordingly. Then, sketch two almond-shaped eyeholes that will help you place his eyes in the next step.

- Draw the Facial Details
Now, it’s time to add Kakashi’s spiky hair. Draw large, jagged spikes extending outward from his head. Next, add his ninja headband by drawing a horizontal band covering the upper forehead. In addition, draw the pupils and the mask covering the lower part of the face.

- Detail the Head
Draw Kakashi’s ears on each side of his head, partially covered by his hair. Then, add small details to the headband, including the metal plate and the band that wraps around the head. Don’t forget to include the Hidden Leaf Village (Konoha) symbol in the center of the headband.

- Draw the Shoulders
Draw the rough shape of his vest with two large padded shoulder guards, which are characteristic of his Jonin uniform.

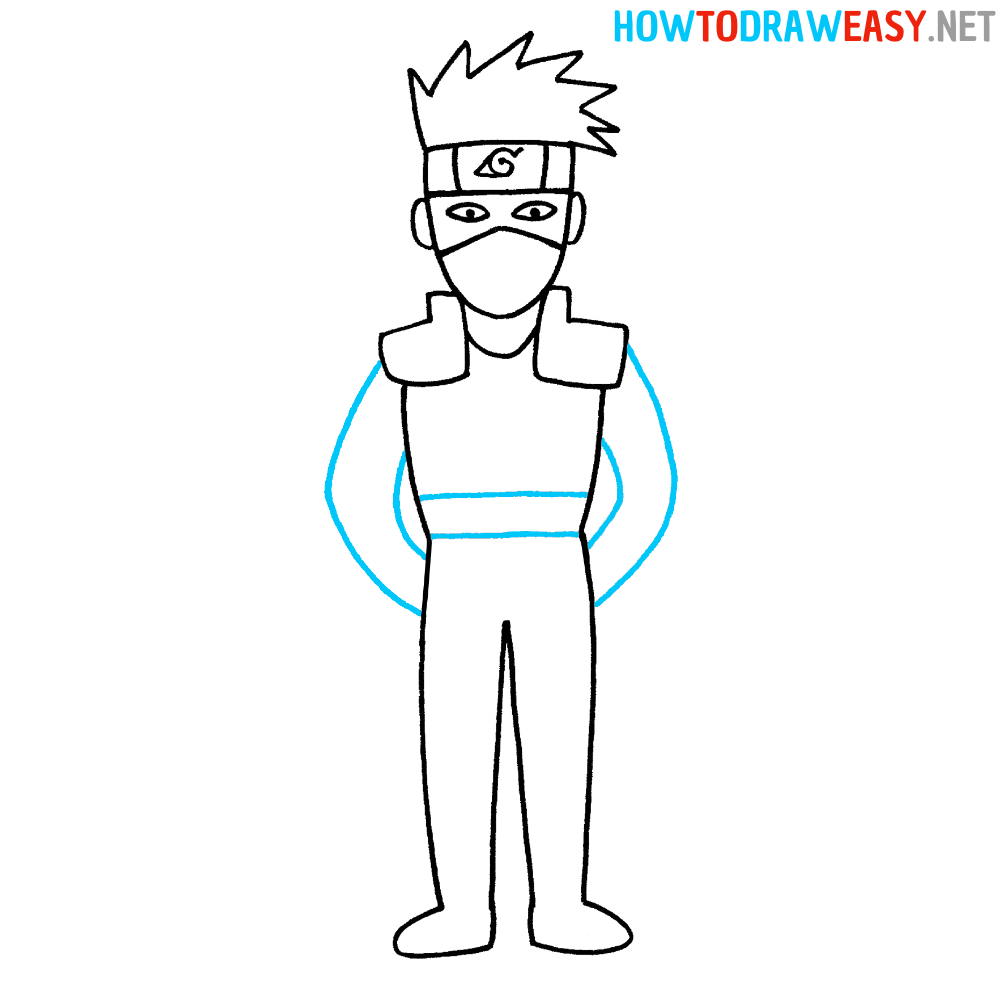
- Sketch the Body
In this step, you will sketch the full body outline of Kakashi Hatake, giving him a structured and proportional form. This part is crucial because it defines the overall stance and posture of the character.
1. Drawing the Torso
— Start with a curved neckline below the mask.
— Extend two diagonal lines outward for the upper body.
— Draw vertical lines downward, tapering slightly at the waist for an athletic build.
2. Sketching the Legs
— From the bottom of the torso, draw two long, slightly curved lines for each leg.
— Ensure the legs are even in width and length for proper proportions.
— At the bottom, widen the lines slightly to form the feet’s base.
3. Adding the Feet
— Draw rounded, flattened ovals for the feet.
— Keep them symmetrical and proportional to maintain balance.
- Draw the Arms and Details
Sketch Kakashi’s arms extending from his shoulders. His arms should be slightly bent and resting behind him. Using slightly curved lines, add the belt.
- Add Costume Details
Add the wristbands around his sleeves, which give his outfit a classic ninja look. Also, following the example, add details of the pants.

- Add the Knee Details
Draw lines on the legs to define and shape Kakashi’s shoes. Then, add bandages wrapped around his right thigh, a signature feature of his ninja attire.

- Detail the Footwear
Sketch Kakashi’s open-toe sandals by drawing curved lines for the foot shape. His sandals should have thick soles with visible straps. At this stage, finalize the details of his leg wrappings and ensure all lines are clean.

- Color Your Kakashi Drawing
Now that the outline is complete, it’s time to color your drawing! Use shades of green for his flak jacket, blue-gray for his pants and sleeves, and black for his gloves and mask. His hair should be silver/gray, and the headband’s plate should be metallic silver with a dark blue strap.
Now you have completed your Kakashi Hatake drawing! Great job!


Congratulations! You’ve successfully completed this step-by-step tutorial on how to draw Kakashi Hatake. By following the structured guide, you’ve learned how to create the iconic features of this legendary ninja—from his spiky hair and headband to his masked face and battle-ready stance. Whether you’re a beginner or an experienced artist, drawing Kakashi is a fantastic way to improve your anime-style drawing skills.
Reviewing What You’ve Learned
Throughout this lesson, we covered several key aspects of drawing Kakashi:
- Understanding proportions to ensure a well-balanced character
- Sketching the face and mask to capture his signature look
- Drawing the Jonin vest and tactical gear for accurate details
- Adding finishing touches and colors to bring your artwork to life
These skills will not only help you draw Kakashi, but also improve your ability to sketch other anime characters with confidence.
Tips for Improving Your Drawing Skills
Now that you’ve completed this tutorial, here are some ways to continue refining your drawing abilities:
- Practice regularly – The more you draw, the better you’ll get. Try sketching Kakashi from different angles or poses.
- Experiment with shading – Adding shadows and highlights can make your drawing look even more dynamic.
- Try different art mediums – If you used pencils, experiment with digital art, markers, or watercolors.
- Draw other Naruto characters – Expanding your skills by drawing more characters will help you develop a diverse artistic style.
More Drawing Tutorials to Explore
If you enjoyed drawing Kakashi, why not try your hand at other popular characters? Here are a few tutorials from HowtoDrawEasy.net that you might like:
- How to Draw Naruto Uzumaki – Learn to sketch the main protagonist of Naruto with all his iconic details.
- How to Draw an Anime Face – Master the basics of anime-style character design.
- How to Draw a Samurai – Improve your skills with a detailed tutorial on drawing a warrior.
Share Your Artwork!
We’d love to see your finished drawing of Kakashi! If you followed this tutorial, share your artwork on social media and tag HowtoDrawEasy.net to showcase your work. Keep practicing, keep creating, and stay inspired by your passion for drawing anime characters!
Happy drawing!