
How to Draw a Fairy
Learn how to draw a fairy with this easy step-by-step tutorial! Perfect for kids, this guide will help you create a beautiful fairy with wings, magical details, and graceful features.


Fairies are magical creatures found in myths, folklore, and fantasy stories worldwide. Their delicate wings, flowing dresses, and enchanting presence make them a favorite subject for artists of all ages. If you’ve ever wanted to learn how to draw a fairy, this easy drawing tutorial will guide you through each step to create a beautiful and charming fairy. Whether you’re a beginner or an experienced artist.
What You’ll Learn in This Fairy Drawing Tutorial
- How to sketch the basic structure of a fairy
- How to draw facial features, wings, and flowing clothing
- How to add movement and expression to your drawing
- How to color your fairy to make her look vibrant and magical
A Brief History of Fairies in Art and Mythology
Fairies have long been a part of cultural folklore, appearing in Celtic mythology, European fairy tales, and even modern fantasy stories. These tiny, winged beings are often associated with nature, magic, and mischief. In some legends, fairies were protectors of forests and streams, while in others, they played tricks on humans who wandered into their enchanted realms.
Throughout history, artists have depicted fairies in various ways—from tiny, glowing sprites to elegant, human-like beings with ethereal wings. Today, fairies are a staple of fantasy art, and learning how to draw a fairy can open the door to a world of creativity and imagination!
Tools You’ll Need for Your Fairy Drawing
Before we start, gather the right tools to make your drawing process smooth and enjoyable:
- Pencil – A basic sketching pencil (HB or 2B) for outlining your fairy.
- Eraser – To correct mistakes and refine your lines.
- Fine-tip black pen or marker – For outlining the final drawing.
- Colored pencils, markers, or watercolors – To bring your fairy to life with vibrant colors.
- Sketchpad or drawing paper – A good-quality paper that suits your preferred drawing tools.
Why Drawing Fairies Is Great for Beginners
Drawing fairies is a fantastic way to practice anatomy, movement, and expression while letting your imagination run wild. Unlike realistic human figures, fairies allow for creative freedom—there are no strict rules on how they should look! You can experiment with different wing shapes, dress styles, and even magical accessories like wands, flowers, or glowing dust.
So, grab your pencils and let’s dive into this easy fairy drawing tutorial! Follow the steps carefully, and by the end, you’ll have a beautiful, enchanting fairy on your page.
Time needed: 20 minutes
Step-by-Step Guide: How to Draw a Fairy
- Sketch the Basic Head Shape
Start by drawing a round shape for the fairy’s head. Add two small oval guidelines for the eyes, and lightly sketch the ears on both sides of the head. This will serve as the foundation for the facial features.

- Add Facial Features
Now, refine the face by drawing large, expressive eyes inside the oval shapes. Add small pupils, eyebrows, and eyelashes to bring the fairy’s eyes to life. Sketch the small nose and a gentle, smiling mouth to create a friendly expression.

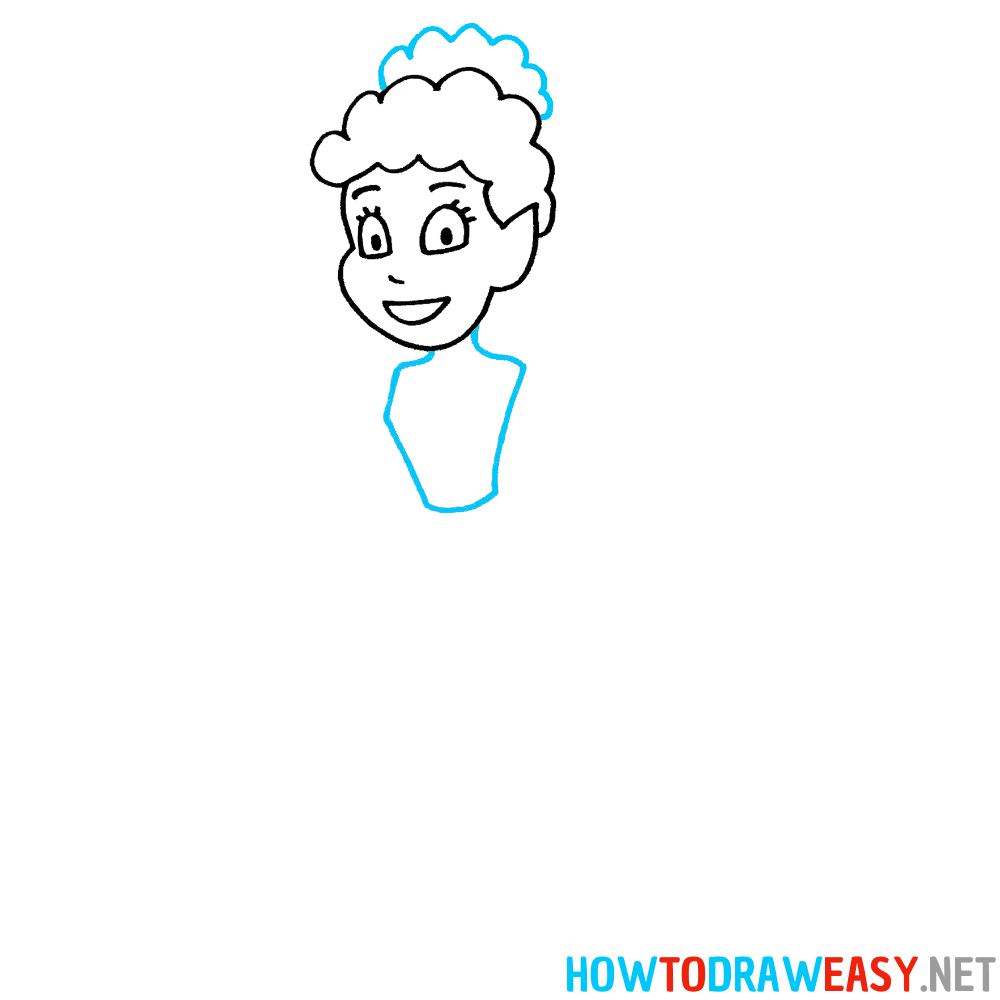
- Draw the Fairy’s Hair
Begin shaping the fairy’s hair by adding curly lines around the head. Give the hair volume by drawing soft, wavy curls piled up on top, resembling a playful and elegant updo.

- Outline the Neck and Upper Body
Draw two curved lines from the bottom of the head to form the fairy’s neck. Below the neck, sketch the simple, form-fitting bodice to outline her upper body. Keep the lines smooth to give the fairy a graceful appearance. This step also shows you how you need to draw the last part of the fairy’s hair using wavy lines.
- Add the Arms and Hands
Extend two arms from the bodice, making them slightly curved to create a natural and relaxed pose. At the end of each arm, sketch small delicate hands with slightly spread fingers, emphasizing a gentle, magical movement. Also, draw the top part of the garment.

- Draw the Skirt
Fairies often wear flowy, nature-inspired outfits. Sketch a layered skirt with petal-like shapes extending from the bodice. Each section should have a slightly curved shape to resemble flower petals. You also need to detail the hands by adding fingers.

- Add the Fairy Wings
Behind the fairy’s body, draw two large, elongated wings. Make them slightly curved and delicate, with pointed tips, resembling butterfly or dragonfly wings. These wings should look light and airy to give a magical effect.

- Sketch the Legs
Extend two long, slightly curved legs from beneath the fairy’s skirt. One leg should be positioned slightly lifted to give the impression of movement, as if the fairy is hovering or gently landing.

- Draw the Feet and Shoes
At the bottom of the legs, draw simple ballet-style slippers, adding small curves for elegance. The feet should be slightly pointed to maintain the fairy’s graceful and weightless pose.

- Color the Drawing
Now, finalize the drawing by adding color! Use soft, pastel shades or vibrant hues to match your artistic vision. Give the dress a bright, nature-inspired color, color the wings with a translucent blue, and shade the hair and skin with warm, natural tones.
Congratulations! You’ve completed your fairy drawing. Keep practicing, experiment with different styles, and create your own unique fairy characters!


Congratulations! You’ve successfully completed this easy fairy drawing tutorial and created a beautiful, enchanting fairy. By following the step-by-step instructions, you’ve learned how to sketch a fairy’s delicate features, elegant wings, and flowing dress. With practice, you can refine your technique and even add your own creative touches to make each fairy unique.
What’s Next? Improve Your Fairy Drawing Skills!
Now that you’ve learned how to draw a fairy, why stop here? There are so many ways to take your fairy art to the next level:
- Experiment with different poses – Try drawing a flying fairy, a sitting fairy, or one casting a magical spell.
- Add background elements – Place your fairy in a mystical forest, a sparkling night sky, or a field of flowers.
- Customize the details – Change the fairy’s hairstyle, dress, or wing shape to create different fairy characters.
- Try new coloring techniques – Use watercolors for a soft, magical look or digital tools for a glowing effect.
Discover More Easy Drawing Tutorials
If you enjoyed this fairy drawing tutorial, check out more step-by-step guides to expand your artistic skills:
- How to Draw a Unicorn – Learn to sketch a magical unicorn with flowing hair and a sparkling horn.
- How to Draw a Princess – A simple tutorial for drawing a graceful princess.
- How to Draw a Butterfly – Create a beautiful, symmetrical butterfly with stunning patterns.
- How to Draw a Mermaid – Master the art of drawing an elegant mermaid.
Keep Practicing and Let Your Imagination Soar!
Drawing fairies isn’t just about following steps—it’s about expressing creativity, exploring fantasy, and improving your artistic abilities. The more you practice, the more confident you’ll become in sketching magical characters. Whether you’re a beginner or an experienced artist, drawing fairies is a fantastic way to develop your skills and let your imagination take flight.
Keep creating, keep dreaming, and most importantly—have fun drawing!